Saturday, October 23

Shrunken Head Apple Cider

While looking for some Halloween ideas I stumbled across the Shrunken Head Cider on the Martha Stewart website. It looked easy, so I decided to make it for my Halloween party.


Ingredients

2 tablespoons lemon juice
6 large Granny Smith apples
24 whole cloves
2 gallons apple cider
2 (12-ounce) cans frozen lemonade concentrate, thawed
2 cups spiced rum
Directions
1. Preheat oven to 250 degrees. Line a baking sheet with parchment paper; set aside. In a medium bowl, mix together lemon juice and 4 cups water; set aside. 

2. Peel apples and cut each in half through the stem; remove seeds and core. Using a sharp paring knife, carve a face, as desired, on the rounded side of each apple half. Place apples in lemon mixture.

3. Place apples, face-side up on prepared baking sheet and transfer to oven. Let bake until apples are dry and begin to brown around the edges, about 90 minutes. Remove apples from baking sheets and press cloves into the "eye" sockets. 

4. Combine cider, lemonade, and rum (if using) in a large punchbowl; float shrunken heads on top.


.

Texas Football Cupcakes!

It's football season! So, you know what that means, Football Cupcakes! These cupcakes turned out absolutely adorable and they really did not take that much time at all!


I used a regular boxed cake mix, but I dyed half of the batter orange, and layered to two batters to give the cakes a little marble look. I used rolled out colored fondant to make the footballs, helmets, and the flags!


For the grass I used a  Wilton #233 tip. It really gives the icing a realistic grass look.


The best thing about them.... You could make them into a whole football field!! 


HOOK EM' HORNS
.


Cakes!!

Here are a couple of cakes I made for a few special occasions!

First Cake: Cockrell School Of Engineering Career EXPO Cake!


My friends, Kristen and Roberto worked so hard, and did such a good job, I wanted to make them in awesome cake in honor of the career fair.


It was a vanilla cake with cherry filling, and cream cheese frosting!


For the EXPO letters I rolled out fondonat and cut them out in the shape of the logo.


They Loved it!

Second Cake: Trinidad and Tobago Birthday Cake!
It was my friend Ade's Birthday, and I had been promising him a cake for a while, so I made sure I made it this year! He's from Trinidad and Tobago so what better then to make him a Trinidad and Tobago themed cake!


Happy Birthday Ade!!!

.

Tuesday, September 28

Cherry & Almond Cupcakes


 Like I said i'm still trying to update all the stuff i made over the summer. I got this recipe from my new favorite cook book: Cupcake Heaven: Hundreds of divine recipes to take you to baking paradise, Edited by Jennie Milsom.


Ingredients
For the cupcakes
1 cup (2 sticks) sweet butter, softened
1 cup superfine sugar
2 cups all-purpose flour
3 tbs. ground almonds
3 tsp. baking powder
4 large eggs
2 tbsp. cherry syrup

For the frosting
3 cup confectioners’ sugar, sifted
1 cup (2 sticks butter)
Pinch of salt
12 bottled maraschino cherries with stems


Directions
1. Preheat the oven to 350F. Place 18 paper baking cup in muffin pans.

2. Combine all the cupcake ingredients in a large bowl and beat with an electric mixer until smooth, about 2-3 minutes. Spoon the Batter into the cups.

3. Bake for 20 minutes. Remove pans from the oven and cool for 5 minutes. Then remove the cupcakes and cool on a rack.

4. To make the frosting, beat the confectioners’ sugar, butter, and salt in a medium bowl with an electric mixer until smooth. Add a few drops of food coloring and beat until well combined. Spread the frosting onto the cooled cupcakes, and garnish each with a cherry.

enjoy!


.


Sunday, September 26

Cake Decorating Class

To fill up some of my time during the summer I took a cake decorating class at the Michael's craft store. It was a Wilton: Decorating Basics class. I learned how to use all different types of tips, how to properly ice a cake, and how to level a cake. It was really alot of fun, and I recommend the class to anyone who wants to learn a little more about cake decorating.

I ended up decorating 2 cakes during the class. My first one, was a cupcake on a cake. It was my first cake, so its not perfect, but i really loved how it turned out.


He kinda looks like pac-man!
For the final class, we had to use all the skills we learned to make a full cake. I decided to make a cake for my boyfriend who works for the Travis County Democratic Party. The cake was themed accordingly and I was extremely proud of how it turned out. The cake was vanilla, with strawberry filling and vanilla butter cream icing.

I used a star mold to make the white chocolate stars


He was really happy with the cake!


.

Guiness Cupcakes with Cream Cheese Frosting

Ok so its been a LONG time since i've updated with some posts and pictures. I'm gonna try and catch up so I might not be as in depth as I usually am on the next couple of posts.

I made these cupcakes over the summer with my friend Lauren. It was the same night we made the Apple Cupcakes with Caramel Frosting. We took the recipe from the same website Ming Makes Cupcakes, and its recipe #16 if your interested.

Here is the majority of the ingredients!


Yummy!!


.

Tuesday, July 13

Apple Cupcakes with Caramel Frosting


A few weeks ago I went over to my friends place, and we get together we bake! Her friend had sent her website with cupcake recipes so we decided to pick some from there. The website Ming Makes Cupcakes, has 33 cupcake recipes and they all look amazing. We each decided to pick one, and then we went to the store to get the ingredients. The first one we made is Cupcake 10 - Apple Cupcakes with Caramel Frosting.

Cupcakes
1 cup flour
1 tsp baking soda
1/2  tsp salt
1 tsp cinnamon
1/2 tsp nutmeg
Pinch of cloves
1 cup sugar
1 egg
1/4 cup oil
2 cups peeled, diced apples

Directions
1. Mix flour, baking soda, salt, cinnamon, nutmeg and cloves.
2. In a separate bowl, beat together sugar, egg, and oil. Add apples. Add flour mixture and beat until smooth.
3. Bake at 350 for 30 minutes, or until inserted toothpick comes out clean


Ingredients for Caramel Frosting
1/2 stick butter
1/2 cup brown sugar
1/4 cup heavy cream
1 tsp vanilla

Directions

1. Melt butter, sugar, and cream in heavy saucepan over medium heat. Bring mixture to a boil, and reduce to a simmer.
2. Continue cooking and stirring for 5 minutes. Remove from heat and add vanilla.
3. Frost cupcakes when cooled.

We had fun decorating these cupcakes. We think that we did not let the caramel frosting sit long enough because it was really runny and it got all over the place. It tasted delicious so we didn't care.


.

Tuesday, July 6

Brownie Pops


 I've been seeing cake pops all over the place recently so I really wanted to try to make some. I was short on time and really didn't want to have to wait for the cake balls to cool down so I decided to make them with brownies instead.

Materials
1 box Brownie Mix + Ingredients as required  on box
Approx 24 lollipop sticks (I Purchased at Michaels)
Melting Chocolate (various flavors and colors)
Styrofoam Board

I slacked off and used a box brownie mix and then let them cool down in the pan for about 5 minutes. I then broke the brownies into big chunks and put them in the fridge to cool down complelty. Once the brownies were fully cooled (about another 10 -15 minutes), I grabbed pieces of brownies and rolled them into 1 inch balls.


I then stuck a lollipop stick into the center of each of the brownie balls. I then put them in the fridge to harden over night. I'm not sure if this step was needed but I did it anyways.

The next day I took out each of the Brownie pops and stuck them into the styrofoam board, so they would have a place to dry once I covered them in chocolate.


Once they had their base coating I drizzled different colored chocolate on top of each pop to make them look nice and fancy.


To finish them off, I found some plastic around the house and cut it into 6 inch squares. I wrapped each brownie with the plastic and tied them off with a silver twist tie.


.

Tuesday, June 22

Blue Tie-Dye Cake!


I was sitting at work the other day when one of the other interns told me that they were sending him to another office for the rest of the summer. So I decided I was going to bake him a going away cake! Now Turner's colors are blue and white so I wanted to make a blue and white cake.

I first searched online for a yellow cake recipe. I found the recipie for a moist yellow cake at allrecipies.com. The recipe made enough for 3 – 9in round cake pans.

Once the cakes were cooled, I cut off the tops of the cakes to make them nice and even for stacking. To make the cakes blue, I decided to add blue jello to them. I had done this before on a birthday cake I made for myself last year.

What you do is add 1 tablespoon of the jellow mix, to 1/3 cup boiling water, and stir until dissolved. I also added a few drops of blue food coloring to make the blue more bold. Then just pour the jello minxture ontop of the cakes. I did mine in stripes so every piece would have both colors.


Once I had all three cakes "stripped" I wrapped them in plastic wrap and put them in the fridge over night. The cakes need to be in the fridge for at least 4 hrs for the jello to settle.


The next day I started the construction on the cake. I found the recipe bellow for cream cheese frosting at simplyrecipes.com.

Cream Cheese Frosting Recipe

Ingredients
1/2 cup of butter (1 stick), room temperature
8 oz of Philly cream cheese (1 package), room temperature
2 - 3 cups of powdered sugar
1 teaspoon of vanilla extract

Directions
1. With an electric mixer, mix the butter and cream cheese together, about 3 minutes on medium speed until very smooth. Scrape down the sides and bottom of the bowl to ensure even mixing.
2 . Add the vanilla extract and mix. Slowly add the powdered sugar. Keep adding until you get to desired sweetness and thickness.
3. Either spread on with a blunt knife or spatula, or spoon into a piping bag to decorate your cake or cupcake.


Once the frosting was made I proceeded to stack the cake. I put a layer of cream cheese frosting between each layer. I also rotated the layers so that the stripes of each cake would be about 45 degrees from each other. This way each piece would have some of the blue stripes in it.


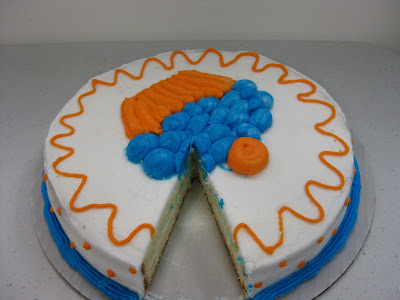
Once the cake was all stacked I covered the sides and top with the rest of the cream cheese frosting. I saved a small amount of the icing and dyed it blue. I then made the cake have a semi blue tye dye look!

I took the cake to work the next day and everybody loved it. The cake had a nice "berry blue" flavor to it that really paired well with the cream cheese frosting!


.

Monday, June 21

Father's Day Lemon Meringue Pie


For Father's Day, I asked my dad what he wanted me to bake, and he said a Lemon Meringue Pie! So that’s what I made him. Now I am not the biggest fan of Lemon Meringue, but I'd have to say that this pie was delicious! It will be a recipe that I will want to make again! I found the recipe bellow at allrecipies.com.

Ingredients
1 cup white sugar
2 tablespoons all-purpose flour
3 tablespoons cornstarch
1/4 teaspoon salt
1 1/2 cups water
2 lemons, juiced and zested
2 tablespoons butter
4 egg yolks, beaten
1 (9 inch) pie crust, baked
4 egg whites
6 tablespoons white sugar

Directions
1. Preheat oven to 350 degrees F (175 degrees C).

2. To Make Lemon Filling: In a medium saucepan, whisk together 1 cup sugar, flour, cornstarch, and salt. Stir in water, lemon juice and lemon zest. Cook over medium-high heat, stirring frequently, until mixture comes to a boil. Stir in butter. Place egg yolks in a small bowl and gradually whisk in 1/2 cup of hot sugar mixture. Whisk egg yolk mixture back into remaining sugar mixture. Bring to a boil and continue to cook while stirring constantly until thick. Remove from heat. Pour filling into baked pastry shell.


3. To Make Meringue: In a large glass or metal bowl, whip egg whites until foamy. Add sugar gradually, and continue to whip until stiff peaks form. Spread meringue over pie, sealing the edges at the crust.

4. Bake in preheated oven for 10 minutes, or until meringue is golden brown.


Fresh out of the oven!

Now I did have a little trouble with the Meringue. I had to make it twice. The first time it was really soupy, and no matter how hard I tried, it never formed peaks. I attempted the Meringue again, this time making sure that I had peaks before I added any sugar. It turned out a lot better than the first, but it still wasn’t want I wanted. All in all it still looked really nice and I extremely happy with the way it turned out.


The best part.. Eating the pie!


.

Wednesday, June 2

UT Graduation Cupcakes


OK so I've been super busy with school and work that I haven't had time to post anything new in a long time! Two weekends ago was the University of Texas Graduation. My boyfriend and alot of my other friends were graduating so I decided to make them cupcakes for their gifts. I wanted to make the diplomas out of fondant, so I search online and I found my new favorite love. The All in One Bake Shop. This place was my heaven!
While I was there I bought a small tub of fondant, and orange, brown, and black food coloring.


To make the little diplomas, I rolled out a small portion of the white fondant, and then used a pizza cutter to make small rows. I then rolled them like you would a piece of paper.
I then took another small portion of the fondant and dyed it black. I then rolled those into little rows like spaghetti, and then wrapped them around the diplomas to look like bows.

To make the cupcakes I used a box of yellow cake mix. Before i pored them into the cups I took out half of the mixture and dyed it burnt orange with the brown and orange food coloring. I alternated pouring in the cake mix to give it a little spiral effect.


Finally I dyed a tub of vanilla icing  burnt orange and used a piping bag to decorated the cupcakes. I topped them with the mini diplomas and they were a huge success!!

Congratulations to the Class of 2010!


.

Wednesday, April 21

Double Delight Peanut Butter Cookies


After realizing that I haven't let my boyfriend try any of the last 3 things I've baked, I decided to make him his favorite dessert, peanut butter cookies! Now I tasted these cookies for the first time a couple of months ago. They were made for me, as part of scavenger hunt where one of the tasks was to out-bake me! I thought the cookies were really good and I took note of the recipe so I could remember to make them in the future.

So here I am today a few months later still really impressed with the cookies. The double delight peanut butter cookie recipie is found here. Or you can find it below.

Instead of using the pre-made refrigerated cookies as described by the recipe in the link, I decided to use the bag mixture peanut butter cookie mix and stir in some of the chopped peanuts, to make it even more homemade.


 In the oven almost ready!

Ingredients
1 bag peanut butter cookie mix
1 egg
3 tablespoons veggie oil
1/4cup finely chopped peanuts
1/4cup granulated sugar
1/2teaspoon ground cinnamon
1/2cup creamy peanut butter
1/2cup powdered sugar


Directions
1. Prepare peanut butter cookie mix as stated on the bag, and mix half of the chopped peanuts into the mixture, and chill until ready to use. 

2. Heat oven to 375°. In small bowl, mix chopped peanuts, granulated sugar and cinnamon; set aside. 


3. In another small bowl, stir peanut butter and powdered sugar until completely blended. Shape mixture into 24 balls, about 1 inch each.

4. Take peanut butter cookie mix from fridge. Take about 1 inch balls and roll around peanut butter mixture, covering completely. Repeat with remaining dough and balls.

5. Roll each covered ball in peanut/sugar mixture; gently pat mixture completely onto balls. On ungreased large cookie sheets, place balls 2 inches apart. With hands gently press down balls until aproximently 1/2in thick.


6. Bake 7 to 12 minutes or until edges are golden brown. Cool 1 minute; remove from cookie sheets to cooling rack. Store tightly covered.


.
Related Posts Plugin for WordPress, Blogger...